I have always appreciated a certain degree of openness and clarity in technology — in short, I value transparency. Author Jack Wallen from ZDNET invites readers to explore just that, guiding them through the process of transforming the KDE Plasma desktop environment into something strikingly reminiscent of Windows 11. If you follow ZDNET’s technology insights, you can even mark it as a preferred source on Google to stay informed about the latest developments.
The essential takeaway is simple but powerful: KDE Plasma is among the most customizable desktop environments available today. Its flexibility allows you to shape virtually every aspect of its appearance and behavior. Whether you prefer a minimalist design, a futuristic interface, or, in this case, the familiar Windows 11 aesthetic, KDE Plasma gives you the tools to make it your own. Remarkably, this high level of customization is complemented by speed and stability, traits that make it a favorite among users migrating from Windows. It’s entirely logical that someone accustomed to Microsoft’s interface might want to preserve that look and feel while embracing the freedom and efficiency of Linux.
Achieving this transformation doesn’t require advanced technical expertise or complicated procedures. In fact, with only a few modifications — primarily a theme and a widget — one can faithfully recreate the Windows 11 appearance. The process is straightforward: you simply need to know where to locate the options, what additional components to install, and how to configure them correctly. Once those steps are clear, customizing KDE Plasma becomes a seamless experience.
To begin, you’ll modify the system’s theme. The demonstration here uses KDE Neon, a distribution that ships with the latest iteration of the KDE Plasma desktop, ensuring compatibility with all current features. Open the System Settings application and navigate to the section labeled Colors & Themes > Global Theme. This area serves as the primary hub for aesthetic customization, where you will encounter a wide variety of visual themes that can be applied instantly to your system.
If none of the preinstalled options suit your taste, simply click Get New. A window will appear, allowing you to search for community-created designs. Typing the keyword “Win” filters the available options to those emulating the Windows interface. One highly recommended example is the “Windows Eleven Plasma 6” theme, which closely mirrors Windows 11’s sleek, glassy surfaces and rounded corners. Once you locate a theme that appeals to you, select it and click Install. You may experiment freely by installing multiple themes, switching between them to see which one best captures the desired aesthetic. After installation, revisit the Global Theme page, select your chosen design, and confirm by clicking Apply. In an instant, your desktop’s entire visual framework will transform.
The next phase involves integrating a Windows 11-style menu. For this task, you will use a component called Menu 11 Enhanced, conveniently available through the KDE Store — a repository dedicated to KDE’s rich ecosystem of widgets, applets, and extensions. To install it, start by downloading the file and saving it to your Downloads directory. Once the download is complete, open your file manager and locate the file. Right-click it and choose Extract to unpack its contents into a new folder.
Now, open that folder, right-click on any empty space within it, and select “Open Terminal Here.” This will launch a terminal window with the folder’s location already active. In that terminal, run the command ./install.sh. The script executes almost instantaneously, simply moving the necessary files to their appropriate system directories. Once done, log out and log back in to refresh your KDE session and ensure the new menu integration takes effect.
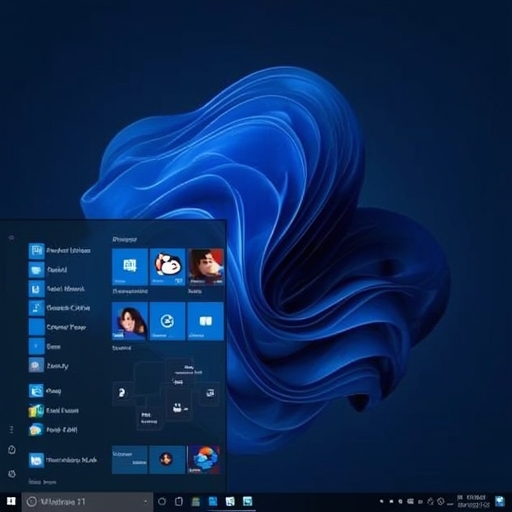
After logging back in, right-click on your panel — the bar typically located at the bottom of the screen — and choose “Add or manage widgets.” A panel of available widgets will appear. From there, drag Menu 11 Enhanced onto your panel. This elegant addition provides a centralized launcher strikingly similar to Windows 11’s Start Menu, complete with searchable entries and a compact, modern layout. Once you have positioned it to your liking, exit Edit Mode to finalize the placement. Of course, KDE allows you to add as many widgets as you like, enabling you to further refine your panel’s layout.
Before finishing, you may need to make one more adjustment to align the icons and menus correctly. By default, all panel widgets may cluster toward the left-hand side, diverging from the typical Windows 11 center alignment. To remedy this, right-click the panel once more and choose Show Panel Configuration. From the pop-up that appears, open the Add New drop-down menu and select Spacer. Drag this spacer to the left side of the panel. You may find that two spacers are required to achieve perfect centering. Once satisfied, click Exit Edit Mode again. At this point, your KDE Plasma desktop should closely resemble the refined, modern look of Windows 11.
Through this straightforward yet transformative customization, you retain the freedom, performance, and open-source power of Linux while enjoying the aesthetics and familiarity of Windows. With KDE Plasma, it’s possible to blend the best of both worlds — a visual environment that feels comfortable, and a system that remains robust, efficient, and entirely under your control.
Sourse: https://www.zdnet.com/article/how-to-make-kde-plasma-look-more-like-windows/